{ Search The Blog }

Thursday, October 23, 2014

Thrifty Thursday: Suitcase Side Table


Earlier this month, my mother-in-law, sister-in-law and I took a trip to Round Top.
If you have heard of this place/event before- you know how amazing it truly is.
I was in pure heaven.

I came back with lots of goodies.

Vinyl Records - 5 for $10
Vintage ruler - $12
Brass candlesticks - $13
Mercury Lamp & Bowls - $25
Vintage Suitcase - $20

I had big plans for the suitcase!

Here is what I turned it into!
 
 
I purchased a DIY 24" barstool from Walmart -  $12 bucks
A can of spray paint - $6
(I wanted the color to closely match the hardware on the suitcase)


(Diaper boxes come in very handy for all my spray painting projects)
 
Once the barstool was dry, I put it together (minus the round top portion) and used a couple of pieces of Velcro to adhere the suitcase to the top of each leg.

*You could screw the suitcase to the legs also. But just incase I want to use the suitcase for something else- I opted out.
 
Viola!
Here is our new bed side table.
 
And all for under $40 Dollars!
 
Happy Hunting!


Thursday, October 16, 2014

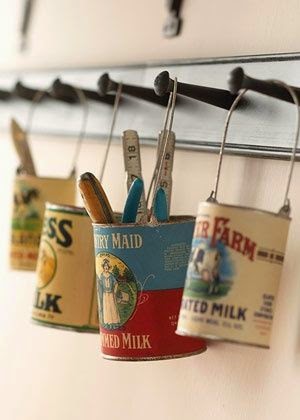
Trending Now: Tin Can Upcycle


Say Good Bye to the mason jar, and Hello to the tin can.
 
 
Start saving your cans now!
 
Here are a couple of great DIY's I have come across.


Christmas tea light holders
 
 
Tin Can Storage
 
Items needed:
Can, paint, lace, ribbon


Kitchen or office can storage
 
Items Needed:
Can, vintage labels printer- found on computer, add wire and hang on rack.
 
 
Just add fire!
 

Happy Crafting!


Images Via:
Pinterest.com


Monday, October 13, 2014

A Halloween Affair


We celebrated our son's first birthday with a Halloween themed costume party.
 
Brayden Cash as Ace Ventura
 

Corey and I as Wayne & Garth from Wayne's World


Our Family!


Here is a {free printable} for the Bats,
I cut them out on cardstock and slightly folded each one in half- to create the illusion that they were flying. 
 
  
Candy Bar
 
 
Poison Apples- Carmel Apple
Eye of Newt- Green Grapes
Crows Bones- White Chocolate Pretzel
Witches Warts- Chocolate Chips
Spider Legs- Black Licorice
Pumpkin Teeth- Candy Corn
Monster Scabs- Wheat Thins
Witches Fingernails- Bugles
Zombie Teeth- Yogurt Covered Granola
Night Crawlers- Gummy Worms with Crumbled Oreos
Hallowed Frog Eyes- Sour Gummy Lifesavers
Ghost Poop- Marshmallows

(I bought different size drinking glasses from the dollar store and filled them with the goodies.
 You could also use different size vases, but I wanted something that I could resuse.)
 
{Free Printable}

Dragon Blood Punch
(adult punch)
 
Apple Juice - 46 ounce
Cranberry Juice- 48 ounce
Ginger Ale - 2 Liters
Berry Vodka - 1 bottle
Red Hawaiian Punch - 46 ounce

(I added a frozen ice hand in also, by filling up a rubber glove then removed the glove once frozen.)
 
 
Swap Juice
(Children's Punch)
 
Limeade- Frozen- 12 ounce
Lime Sherbet- 1 quart
Sprite- 2 Liters
(With ice hand)
 
 
Special Brews and Poisons
 
 
We filled mason jars with fake ears, fingers, a heart and a brain.
There was also a hand- chilled on ice.
The rest of the bottles I spray painted and labeled with different spooky, creepy ingredients.


I covered the canvas we have hanging in our dining room with black fabric and painted
"Happy Birthday Brayden"- with white fabric paint.
 
 
Floating Witches Hats & a Broom- hung with fishing line.
 
 
Bloody Towels 
 

We turned out bathroom into a creepy crime scene. 
 
((This part was for adults only- a little too scary for the kiddos.))
 
We got a mans head from the spirit Halloween store. This head inspired the whole creepy bathroom idea. My husband built a body out of a men's dress shirt and a pair a jeans. 
 
 
He stuff the clothes with newspaper and added some wire to the legs and arms so that he could bend the man in place, and to help make it look a little more realistic. 
 
 
  We got the fake blood from the spirit store also! 
((It washed off our bathtub with just soap and water.)) 

Spooky Candles


I bought white pillar candles and a black and red candle stick. 
How-to
Light the candlestick and drip the wax down the pillar candles.  
 
 
We made a Time Capsule for Brayden


We also had a jar filled with Candy Corns- for kids to guess how many were inside, for a prize.

 
{Free printable}
 
Most of the décor was made and installed by me, my husband and my mom.
We may or may not have went a little over board.. haha. But it turned out great, defiantly will go down in the books as one to remember.
However, I am not so sure how we are going to top this party in the years to come?!
 
Happy Birthday to our handsome baby boy!
&
Happy Halloween to you all!


Thursday, October 9, 2014

Follow my blog with Bloglovin

 
Come follow me on Blog Lovin'


Ashley Barrett Designs

 
I have recently retired the "Behind The Design" blog name- for "Ashley Barrett Designs"
To hopefully better sever has an umbrella.

Same blog, same me- just a new name.
I hope my previous readers are still able to locate the blog and still enjoy enough to follow along.
 
Please stay turned for updates and changes.
 

Monday, September 29, 2014

DIY: Urban Guest Retreat

 
This weekend, we worked on our guest bedroom.
My mom is coming to town for our son's first birthday- so we wanted to get the room ready for them.
 
I was inspired by this painting job, I found on Pinterest.
 
 
Before
 
 
A blank slate
 
Materials Needed:
 
 
Color Pallet:
Glidden
Deep Onyx- CN65
Mansard Stone- CN51
Blue Forest- CN21
Candlestick Silver- CN50
 
The taping...
 
 
There was no real rhyme or reason- just to make sure each one was a triangle.
 
Painting complete

 
Let dry- for at least 1-2 hours
 
Time to remove the tape!

 
and---  Voila' !!!!
 
You will also notice- we used pallets as the bed frame.
This is a queen bed- we used a total of eight pallets.
 
 
 I found this huge black and white piece of artwork at Goodwill for $25 bucks!
 
 
I also found this fabric at the Goodwill for $3.99.
It was actually a shower curtain and I used the fabric to make Euro pillowcases.
 
The bedroom is really coming together nicely.
We are so in love with the way the wall turned out!
 
 
The painting probably took us about 4-5 hours to complete.
Total spent= around $140 with paint, materials, pallet, artwork and fabric.


Images via:
ME