{ Search The Blog }

Wednesday, November 20, 2013

Trending Now: Color Blocking


You may have noticed the popular, bright color blocking trend in the fashion world during the summer.
 
Well- it has made its way to the design world for fall.
But in soft neutrals.
 
Color blocking in window treatments is a great way to introduce the trend into your home.


You can make a big statement in your space this way.

Or try adding in a few throw pillows or a colorful ottoman to create the look.

 
Green can be a neutral too..
 
Be brave & have fun with your home.
 
Images via:
Yahoo
ElleDecor
Pinterest


Tuesday, November 12, 2013

I'm Back

 
I can not believe how long it has been since I last posted on my beloved Blog.
I am very sorry readers for being out of touch. I have missed writing a great deal.
But life has been pretty crazy for me these last couple of months.
 
As you know I was pregnant (for this entire year!!) well--- We finally had our beautiful son Brayden, who was born on
October 13 at 1:05am
Weighing 9lbs even and 21 inches long.
 
 
5 Days Old
 
 
28 Days Old
 
Corey and I also got married on November 7th!
We had a small ceremony with our family- it was lovely.
 
I am currently on maternity leave and enjoying every minute of being a mom.
But I am hoping to snag some time so I can keep my blog updated.
 
Thank you for sticking around.


Thursday, August 29, 2013

Thrifty Thursday: Metallic Accents


You may have noticed that, metallic- any- thing- is all the rage at the moment.


Well if you are interested in recreating this trending look- for less.
Here's what you will need:


Gold or silver metallic spray paint
(Krylon & Rustoleum make great products and colors)
 
Take a trip to your local thrift store or Goodwill to find something like this

 
(or maybe you already have accents around your house that could use an update)
 
Cover in gold or silver
anddddd
BAM!
an instant update and so cheap to do also!
 
Happy Thrifty-ing!
 
images via:
Yahoo
Pinterest


Tuesday, August 13, 2013

Before & After: Master Bathroom #3

 
This master bathroom had good bones, but the tile work and craftsmanship had to go.
That is where I came in...
 
Before


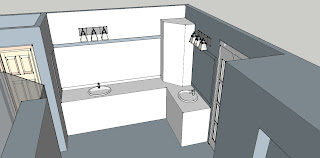
The Plan


After

Custom cabinetry

Granite countertops
 
Fabulous tile work


Shampoo niche and rain shower glass
 

Accent glass

A new linen cabinet built in
 
 
The finished project came out beautifully- and the clients were trilled at the end.
What more can you ask for, right?
 
 
Images via
{Me}


Thursday, August 1, 2013

Thrifty Thursday: Fabric Covered Canvas


Do you have any left over canvas'? Or perhaps something you previously painted doesn't work for your home anymore?
 
What better way to reuse them- than to just re-cover them with fabric for a totally new look.
 
That's exactly what I did for this next project.
 
 
Supplies Needed

 
16x20 Canvas
Wooden Letters
2.5-3 Yards of fabric
Spray paint
Staple gun
Hot glue gun
 
Step One:
 
Spray paint letters
(you may need more than one coat of paint on each letter)
 
Step Two:

 
Cut fabric
(make sure you have cut enough to fold over to the back)
 
Step Three:

 
Staple corners of fabric

 
Then staple side
Repeat on all sides
Trim excess material
 
 
Step Four:

 
Glue letters on top of fabric
& hang!

 
Total cost: $30
Time: 1 hour + drying time
 
Images via:
{Me}


Friday, July 26, 2013

Trending Now: Indigo

 
This regal color is popping up all over the design scene.

As I always say- if it's happening in the fashion world, you know we will start seeing it over in the design world ASAP.

Here are some beautifully decorated spaces with the vibrant color showing up all over the place.


Try out the fabulous color in your own home. Start small with a few accents or go big by painting a wall or two.
 
 
Images via:
Yahoo
Google
Pinterest


Saturday, July 13, 2013

DIY: Pallet Headboard


Supplies
Two 3’x3’ pallets
(based on size of bed- mine is a queen)
One thin sheet of plywood- 3’x6’
Wood screws
Drill
One 2x4
Saw
Four sets of: Wall mount brackets

(male and female interlocking parts)
Two queen mattress foam toppers
Batting
Fabric- to cover
Staple gun & staples
Buttons for tufting
Hot glue gun
Large sewing needle
Metal wire
Wire snips
Step One
Remove the vertical slats from back of pallet, so that it will set flush on wall.
Step Two
Place the two pallets side by side facing up. Attach sheet of plywood to top of pallets with drill and wood screws. This is what will secure the pallets together- so use as many screws as possible.
Step Three
Measure and using saw, cut down 2x4 to cover exposed sides of pallet
Step Four
Plan out the layout for your button placement.
Measure and drill holes accordingly.
Step Five
We decided we wanted a floating headboard- so to achieve that:
Attach male side of wall mount brackets to the pallet.
Measure and drill female side to wall
(Place headboard at its construction state to see if brackets line up)
 
 
Step Six
Attach the two layers of mattress foam to all sides of pallet- Staple to the back of pallet to secure
Add batting next- this will add for a cleaning look.
Cut foam and batting away around brackets
 
Step Seven
Lay out your fabric (iron if needed) on flat work surface (the floor works great)
If you are using a patterned fabric make sure material is straight
Lay pallet on top of fabric
Fold sides over to back
Pull tight and staple to secure
Cut fabric away from brackets
 
 
Step Eight
(Tufting with buttons)
(I didn't find buttons I liked, so I bought the packages to make your own. I used the same fabric I picked to cover the pallet with.. I will say it was pretty hard work- this is where the hot glue comes into play also.)


Feed wire from back of pallet with needle
Once fed- Place button onto wire
Loop wire around onto its self to create a secure hold
From back- pull wire tight
(to create the “tufting” effect)
and staple down to hold, snip excess wire


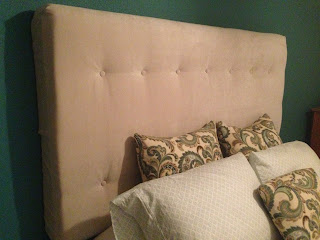
You are finished!
Time to place headboard on to wall!


(We painted the back wall so that the headboard would stand out more)
(Color used: Lost Atlantis- from Lowes)
 
Total cost- $160
Total time spent- Fours hours
 
 
Images via:
Me